| Basic
Customization: Using Tables for Formatting
Banner
Footer
A Warning!
Troubleshooting
Resources
Many
websites use a two-column layout, with the left column for navigational
links, and the right column for content - like we've done here.
You can
use tables for formatting with Web Crossing, too. The code illustrated
here will produce a layout approximately like this:
Banner
Put
the opening table code in the Banner section of the Control
Panel >Customizing
> Banner, footer, background, and top-level page appearance.
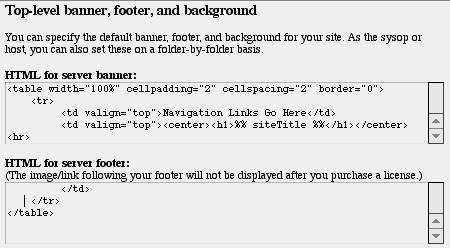
In that box, type the following tags to create the navigation
cell and open the content cell:
<table>

                   <tr>

                      <td valign="top">

                      (Links Go Here)

                      </td>

                      <td valign="top">
Put
this table opening before or after the existing default code already
there, depending if you want the title to appear at the top center
of the page or at the top center of the right content table cell.
The valign="top"
forces the nav bar to the top of the column no matter how large
the content cell is.
Footer
Into
the footer, type the following additional code before any
generic footer code you might have, to close the content
cell and close the table:
      </td>

                   </tr>

                </table>
Click
Update Top-Level Settings, and the page will reload and
display a sample page with your new Banner and Footer settings,
including your new font tags. If you like what you see, click
OK at the bottom of that page. If you want to make further changes,
use the Back button in your browser to go back to the Edit
page.
| WARNING!
If your code is incorrect, your pages may not display
correctly and you may not be able to return to the Control
Panel to make edits. To provide yourself with a safeguard,
open two browser windows, both to this same page in the Sysop
Control Panel. This allows you to experiment in one,
knowing that your old layout is "safe" within your second
browser window and you can always return to edit the fields
and remove the table tags if necessary. In addition, the Web Crossing
FAQ describes
a fix. |
Figure 2 - Screenshot of Sysop Control Panel with table-generating
code in place.

If your
right-hand table cell becomes narrower than the width of the default
textarea box for posts, editing, etc. (70 characters) you can
change the width of the box in the Control
Panel >
Customizing > General > Presentation.
However,
you will have to manually change any textarea width code in your
webx.tpl file.
| Note:
The Web Crossing image and logo appears below the footer
on unlicensed servers. To remove this, you'll need to paste
in a license certificate. |
Troubleshooting
My page
doesn't look right!
- If
your page displays incorrectly, click the BACK button in your
browser to get back to the edit form and try again. Here are
some things to check:
- Do
you have the tags in the proper places? Are there typos?
- Did
you include the closing tags in the footer?
- Did
you put the tags in the proper blanks in the Sysop Control
Panel?
- Does
your code appear correctly in the page source?
- If
you get a totally blank page, you're probably missing a closing
/table tag somewhere.
I have two copies of the Web Crossing logo in the footer.
- Delete
the Web Crossing link and logo in the footer so you don't have
two. The lower one is actually hard-coded into the free 1T server
until it's licensed.
Resources
See Folder
Customization Chart.
Web Crossing
FAQ:
Sysop Control Panel
- Customizing
- Banner,
footer, background, and top-level page appearance
- General
> Presentation (width of post box)
|

